|
On this day in 1776, White men gained freedom from Great Britain by trafficking, exploiting, and grossly violating the rights of Black and Indigenous people. Here is a non-exhaustive list of things to do and resources to take advantage of instead of celebrating. Educational ResourcesReadings (Credit to Leah Thomas [@greengirlleah on Instagram], more resources on Leah's account)
Action ItemsOrganizations to Donate To (Credit to Leah Thomas)
Other Links and Things To Do
12 Comments
Today is Juneteenth, the anniversary of the day federal troops arrived in Galveston, Texas to ensure that all enslaved people were freed. It serves as a powerful reminder that "nobody is free until everybody is free." Despite the fact that Congress has repeatedly refused to recognize Juneteenth as an official holiday, Juneteenth is a holiday that should be a testament to the resilience, optimism, and strength of Black people. It is important to actively fight racism every day, and it is especially important to honor today's holiday. Below are some resources to learn about Black history and racism and to contribute to the Black Lives Matter cause. Update 6/19/21: we're added more links to mutual aid, Black-owned businesses, and Black creators to support. Educational ResourcesFilms and Videos:
Additionally, Alexis Williams has created a Juneteenth page on her website, PB Resources - check it out here, and make use of the historical information, legislative action tools, and links to organizations you can support. Redistribute FundsWhere you put your money on a daily basis is a crucial form of advocacy! To fund anti-racism work and help close the racial wealth gap, it's important to regularly donate to Black-led organizations and Black people and buy from Black-owned businesses (as you are able and within your financial means, of course). In addition, all Black lives cannot matter until Black women/femme/gender non-conforming, Black LGBTQIA+, and Black disabled lives do, so we strongly encourage you to donate what you can to organizations that support LGBTQIA+ Black people. Below are some pointers. Organizations to donate to (if you work for a company that is matching donations, these are some great options for those matches):
Non-Monetary AdvocacyWe recognize that not everyone has the financial means to donate, and that's okay! Here are some free ways to contribute to BLM:
That concludes today's post. As usual, please do not hesitate to email us at i[email protected] if we have made a mistake (whether it's incorrect information or racist language). Happy Juneteenth, and remember that persistence is key in activism!
Update 6/20/20: a previous version of this post stated that Juneteenth should be recognized as the true Independence Day. However, this article points out that this is flawed because the enslaved people's "freedom" was only in name. This is due in large part to the establishment of Black Codes and Jim Crow laws that indirectly continued slavery. We apologize for the error in the original post. In honor of #ShutDownSTEM Day, we are taking today to step back from computational linguistics. In particular, we are doing a deep dive into how systemic racism and anti-Blackness are embedded within human language. After all, technology is only as good as the humans behind it, so computational linguistics is only as just as the human language it is built upon. In this post, we'll highlight some common terms in everyday conversation that are actually rooted in racism and White supremacy. These aren't the sadly still-widespread racial slurs that are outright horrendous--rather, they're more subtle words and phrases that are still ubiquitously used. While subtle racism in language may not seem important, it matters because it shows just how deeply white supremacy is embedded in our society. Language is a direct reflection of culture: to combat systemic racism, we need to not only abolish unjust institutions and stop murdering Black people, but we also need to change our fundamentally racist culture from the roots up. A few notes before we dive in:
Observing the Bender Rule, we want to state upfront that this post focuses on racism embedded in the English language and, by extension, in American society. We acknowledge that racism is present in other languages as well and that the analysis that follows may be English-specific. We at LingHacks also acknowledge that we have used some of these terms in our programming in the past without realizing that they were racist, and we sincerely apologize for that. By calling ourselves out, we hope to also normalize the process of learning and changing opinions given new information. Another (at this point standard) disclaimer: the author of this post is not Black and is by no means an expert on linguistics or racism. If anything in this post is incorrect or if you have any concerns about the content in this post, please email i[email protected] and we'll correct our information. Without further ado, here are some racist everyday terms (in that vein--we realize that we're saying the word "racist" a lot in this post, but we think it's important to be direct about this crisis instead of using euphemisms out of a thesaurus). "Whitelist" and "Blacklist"Putting something on a whitelist (or whitelisting something) usually means marking it as safe, allowed, or good. Putting something or someone on a blacklist means marking them as banned, dangerous, or bad. This is racist for pretty apparent reasons--it implies that white is good and black is bad. LingHacks apologizes for previously asking participants to whitelist our email domain so that hackathon and workshop registrants could get notifications from us. This isn't the only pair of terms that implies that darkness is bad, but it's just one prominent example that is especially relevant in the technical and professional spheres. AlternativesIn the particular context of asking people to make sure your emails don't go to their spam, an alternative to "whitelist" would be "mark as safe" or "mark as safe sender"--it's more to the point anyway. In general, an alternative to "blacklisting" someone is "writing someone off" or "no longer associating/engaging with someone." As nouns in general, some have proposed "allowlist" and "blocklist." "Master" (and "Slave") BranchesThis one is for everyone in STEM who uses some form of version control (e.g. Git[Hub]/[Lab], BitBucket, etc). For those unfamiliar with American history, "master" and "slave" refer to the relationship between Black slaves and their White owners back when slavery was legal in pre-Civil War America. AlternativesIf you are a Git user, rename all your "master" branches to "main"! You can do this using the guide here. Alternatively, run ```git checkout -b main``` followed by ```git push origin main```. Then, go to your remote repo (i.e. on the GitHub, GitLab, or whatever website), click on "[x] Branches", change the default branch from "master" to "main", and delete "master." Though this isn't as common as "master," if you have a "slave" branch, rename it to something remotely indicative of what that branch is actually for (we really hope that "slave" doesn't fit that bill). Do the same thing as you did for "master" --> "main", but just don't change the default branch if it isn't your default branch (simply delete "slave" after the renaming is done). We also call on leaders in industry, academia, nonprofits, and government--engineers, program managers, system administrators, data analysts, research scientists, and anyone who has ever used version control in industry--to stop using "master" as their default Git branches and rename everything to "main" and to abolish "slave" branches as well. Color (e.g. to color one's judgment)Saying something "colors" your judgment of something else is commonly defined as that something making your judgment worse or less reliable. For pretty obvious reasons, this implies that coloring something degrades it. This is wrong! Along the same line, saying that something "blackens" your judgment, experience, or view is racist for the same reasons. AlternativesSay what you mean. In general, "impair" or "negatively affect" are probably better choices. If you can be more specific, be more specific. As a silly example, if you've just eaten a Jolly Rancher, instead of saying that that "colors" your judgment of the savory chicken tenders you're about to eat next, just say that the sweetness of the Jolly Rancher might make you taste the chicken tenders to be more bitter than they actually are. You might be noticing a common pattern here--several of these terms are just blanket generalizations of more specific things. By more directly stating the particular message you're trying to convey, you'll probably be able to avoid using these terms altogether! Capitalize "Black" and "White"This article explains it better than we do, but in a nutshell, people often refer to Black and White people as black and white people (lowercase). We capitalize Asian American, Latinx, and Native American, so it's important to also recognize Black and White as races and not the colors that their lowercase counterparts refer to (again, important to decouple color from race). Moreover, both Black and White need to be capitalized because referring to White people as white people implies that being White is the standard or default--that is racist. UPDATE 11/21/20: new scholarship has been published about the capitalization of "white" (see this article from the Columbia Journalism Review). While some argue that it is racist to capitalize one of Black and white, others say that capitalizing "white" legitimizes whiteness as an ethnic or cultural group, which it is not (it is a social construct). Black culture exists because Black Americans have had a unique experience, but white culture does not exist. Furthermore, racial groups are not monoliths, so the article (quoting from several sources) mentions that one should probably be more specific when possible (e.g. specify African or African-American instead of Black, specify nationality or ethnicity instead of race). That said, there are some issues that are issues of racial groups (e.g. white supremacy), and it is a tough call whether to capitalize the "w." Given this new information, we at LingHacks will lean towards not capitalizing "white" when we need to use the term, but we welcome additional sources that support or challenge this decision. In any case, do make sure to capitalize Black because Blackness encapsulates the unique lived experiences of a group of people and not just skin color. Thank you to one of our Instagram followers for raising this issue! AutocorrectThis isn't referring to the word "autocorrect" or any specific word, but we thought it was important to highlight nonetheless. Autocorrect repeatedly misspells Black people's names (more generally, most non-White names), even when you type them in correctly. This is largely due to the systemic issue that autocorrect is trained on datasets that do not contain these names. With many back-and-forth exchanges happening through messages and social media posts, the repeated misspelling of Black people's names can cause misrepresentation of Black culture on a large scale. This is dangerous and perpetuates continued injustice. The fix for this is both personal and institutional. First, we call on Apple, Google, and all companies that employ autocorrect technologies to train their autocorrect programs to recognize Black names (the list of Black people who have been unjustly murdered in the past decade is a good starting point). Second, while companies work on that, you as an individual can also take a few actions to mitigate the misrepresentation caused by autocorrect. (1) Make sure to learn the spellings of Black names before you use them. (2) Make sure to proofread your texts and posts. (3) It's probably good to turn autocorrect off, but if you can't or don't want to (which may be valid), then write as many messages and posts as you can and force-revert any autocorrects to Black names so that your local system learns. The Bigger Picture: Language JusticeThese terms are only a small part of a larger pattern of language injustice that hurts BIPOC. For more resources on how to build language justice in your communities and beyond, see below: That concludes our list of racist everyday words and language justice resources that we wanted to highlight. This list is by no means comprehensive--it's just a few of the most prominent terms that the members of our team have encountered in our circles and daily lives. More resources on racist language can be found here and here. Be sure to persist in your activism in the long term and actively work toward being anti-racist every day.
To conclude, and because it bears repeating: Black lives matter, now and forever. In no uncertain terms, Black lives matter--now and forever. The recent murders of George Floyd, Ahmaud Arbery, Breonna Taylor, Tony McDade, and countless other Black people are reprehensible and reflect the abhorrent reality of systemic racism in America.
We previously updated our COVID-19 resource page with links to educational media, petitions, and organizations to donate to. However, that was not nearly enough, and the Black Lives Matter movement deserves not only a highlight of its own but also much more--from amplification of Black voices to monetary donations to petition signatures to raising awareness and spurring action on as large a scale as possible. We reiterate that we understand that as non-Black people, we will never fully understand the racism and brutality that Black people have been historically subjected to, and we fully acknowledge the privilege inherent in this lack of understanding. We unequivocally stand with the Black community and against the senseless murders of its members by police. That said, words can only do so much. Here are some concrete actions we are taking:
Here is a starter list of resources with concrete actions that you can take:
Thank you to all of the organizations and individuals that have stepped up, spoken out, and acted. The fight for racial equality certainly didn't start here, and it doesn't end here either. Black lives matter, now and forever. Update 6/10/20: a previous version of this post failed to capitalize the word "Black" as it referred to the Black race. Per this article, we realize that this was wrong and apologize for the mistake. We have edited this post accordingly. Python Pt. 2 with a Dash of BashWelcome to LingHacks' second tutorial blog post! This week, we'll be covering some intermediate Python concepts that find frequent use in machine learning applications (or really, any large software application). Namely, we'll talk about (1) how to read (in) and write (out) various types of files, (2) how to collect and process user (in)put, (3) how to read and parse command-line arguments, and (4) how to handle (oops) errors that might come up in your code. Throughout the tutorial, we'll also be mixing in (5) some handy commands in the Bash scripting language that enable us to handle all these files and inputs. As usual, we'd love it if you could fill out our guest book for this post here to let us know that you've gone through this tutorial to some extent. As another update, we've revised our first post with COVID-19 resources here. If you're not familiar with basic Python, check out last week's blog post here for a refresher. That aside, let's get into it! Similarly to last week, feel free to use your favorite text editor offline, or if you don't have Python installed, open up a repl.it workspace by clicking here (and sign up/sign in to save your work if you wish). There are also some check-your-understanding quizzes sprinkled throughout--as always, they're just there for your edification and don't collect any personal information. File I/OOne key task found in many programming contexts is handling files. Files come in tons of different types and sizes, from PDFs of textbooks to PNGs of cats to code files to data sheets. When coding, you'll often want some information from a file that you'll have to read in, and you might also want to spit some information out into a file that you write out. That's why it's called I/O--I for reading in information, O for writing it out. On computers, files are organized into folders, which are fancily called directories in computer-speak. Depending on what type of machine you use, you may be familiar with "Desktop," "Downloads," "User," etc. All of these are names of directories, and they all contain files and perhaps other subdirectories (directories inside directories)! The concept of directories is also seen in Google Drive--there are folders that you can create, move, share, and more. We'll assume you know how to manually create, delete, and modify files on your local machine if you're using an offline editor for this tutorial. If you're using repl.it, here's the low-down on how to create files and directories on the site:
 The Bash BasicsIf you're using your own offline editor, open up Terminal (an app that should come with your machine). Terminal is basically an interface (fancy word is shell, or command-line interface) where you can enter a ton of commands (hence the name) to perform a ton of functions, from running code to writing code to organizing, creating, and deleting files. That last functionality is what we're going to focus on in this tutorial. If you're using repl.it, here's how to open up the shell:
With that, you should be good to go to start learning some commands in the Bash scripting language (the language used by the command-line interface). The first command we'll cover is ls, which stands for list. When you type ls and hit enter (which is the way to execute commands on the shell in general), you'll get a listing of all of the files and directories in the directory that you're in right now. This is basically everything you can "see" from the folder you're currently in. As an example, here's what I get when I type ls into my repl.it shell:  In the top level of my workspace, I have my main.py file (the default file that repl.it creates for you when you open up a new workspace), a file I created called anotherfile.py, and a directory I created called mydirectory. That's ls! The next command we'll cover is pwd, which stands for print working directory. Your working directory is the directory that you're in right now. When you first open up your shell, you'll be in your home directory by default (think My Drive or yourUsernameOnYourMachine). When you run pwd in your shell, it will print the absolute path to your current directory. Here's an example, with a full breakdown afterwards:  First, some terminology. A path is a specification of how to get to your current directory or a directory you want to get to. For example, in Google Drive, if you had a folder called "Poems" within a folder called "English" within a folder called "School", the path to "Poems" would be from the root directory would be My Drive -> School -> English -> Poems (that's the order of the folders that you click on). However, the path from My Drive would just be School -> English -> Poems, since you're already in My Drive. The path from School would just be English -> Poems. These last two paths are called relative paths because they depend on where you are right now. If you're in My Drive, you can only see the directories that are right in My Drive, and English is not one of them! So, if you were to take the path of just English -> Poems, that wouldn't make sense, since you can't see English from where you are! If you were in the English directory and you tried to take the path of School -> English -> Poems, that also wouldn't be possible, since you can't see the School directory from English! So, these paths are all relative to where you are right now. Contrast this with the first path from the root directory, which can be thought of as an absolute path. No matter where you are, you can always click on My Drive, from which you can go School -> English -> Poems. An absolute path, then, is a path specification that doesn't depend on where you are right now. It relies on the concept that no matter which directory you're in, you can always see the root directory, and you can always go down from there. In Bash (and in programming in general), we write paths with slashes to separate directories. For example, if you had a folder called "me" in a folder called "people" that was directly inside the root directory, your absolute path would be /people/me. The first / indicates that you're starting from the root directory. If you're in a directory and want to access a relative path, simply exclude the /. For example, the relative path to "me" from the root directory can just be written as people/me, since you can see "people" directly from "root". This path notation also extends to files. If I had a file called "yeet.txt" inside "me", the absolute path would be /people/me/yeet.txt (note: the path includes the extension, "txt"). So, the output in the screenshot above tells me that the root directory contains a directory called "home", which contains a directory called "runner", which contains a directory called "PythonBash", which is what I happened to name my workspace (by the way, you can change your workspace name by going to the upper left hand corner and clicking on where it says [yourUsername]/[randomlyGeneratedName]). This workspace is where I am right now! It's useful to run a quick pwd when you want to check where you are, what you can see, and what might be going wrong with your program if you're calling some files and they're not turning up. The third basic command is cd, which stands for "change directory." You type cd followed by the path to the directory you want to change, or go, into. This path is considered an argument to the cd command--basically the thing that the command is applied to (if unfamiliar, recall the "try a bite of pasta" vs. "try a bite of salad" analogy from "Functions" section of the previous blog post). Once you cd into that directory, you're "in" that new directory, so the files and directories you can now see are the ones that are visible from that directory. Here's an example of what happens when I cd into mydirectory:  As indicated by the text in blue, we're now no longer in PythonBash, but rather in mydirectory! Another piece of syntax to note here: the ~ is a shorthand in Bash for home. It's not the root directory, but it can be cd'ed into from any directory any number of levels below home. To be precise, here's the exact directory that repl.it considers home:  The naming is a bit confusing, but in this workspace, "runner" is considered the home directory. A final note about cd: when you try to change into a directory that can't be seen from your current directory, the shell will throw an error and say "No such file or directory." This will happen whenever you pass in some sort of file path that isn't valid relative to the current directory. Check your understanding of cd with the following quiz question! The answer and explanation will pop up once you click "Submit." So far, we've covered cd, ls, and pwd, which allow you to poke around in your file system and see what's there. The next few commands are for file creation and deletion. First up is touch, the command for file creation. When you type touch [filename], it creates a blank file with the specified name in the directory that you're currently in. Make sure you cd into the correct directory before touch-ing a file! The opposite of touch is rm, which is short for remove. It does what it sounds like it does--rm [someFile] removes a file by the specified name. Important: rm is not like Move to Trash--it deletes the file forever! Once you rm a file, you (basically) cannot get it back or take it out of the trash, so be very careful before rm-ing anything! From this point forward, it's also helpful to think of your Trash bin as more of a recycling bin--you can recover the contents for a certain amount of time. The real trash is rm, and you can basically think of it as a trash can that incinerates your files instantly, so you can't recover it. There are similar (but separate) commands for creating and deleting folders. To create a folder, the command is mkdir [someFolder]. That stands for make directory. To delete a folder, the command is rmdir [someFolder]. Again, rmdir is not like Move to Trash--an rmdir'ed folder is gone forever! Another note about rmdir: for safety, it only operates when your directory is empty. So, when you try to rmdir a directory that still has files or directories in it, it won't execute (this is probably a good thing). So, when you want to remove a whole folder, you're literally forced to go in and remove every individual file and subfolder to make sure you really want to get rid of the entire thing. Disclaimer: there are commands that force removal of entire full folders and subfolders, but they're not needed for this tutorial, and they're also very dangerous, so we're not going to cover them here. Just in case someone tries to pull an evil prank on you though, here's a link to some dangerous commands that you should not execute. Here's another link to an explainer. With that said, here are some examples of the touch, rm, mkdir, and rmdir commands in action: 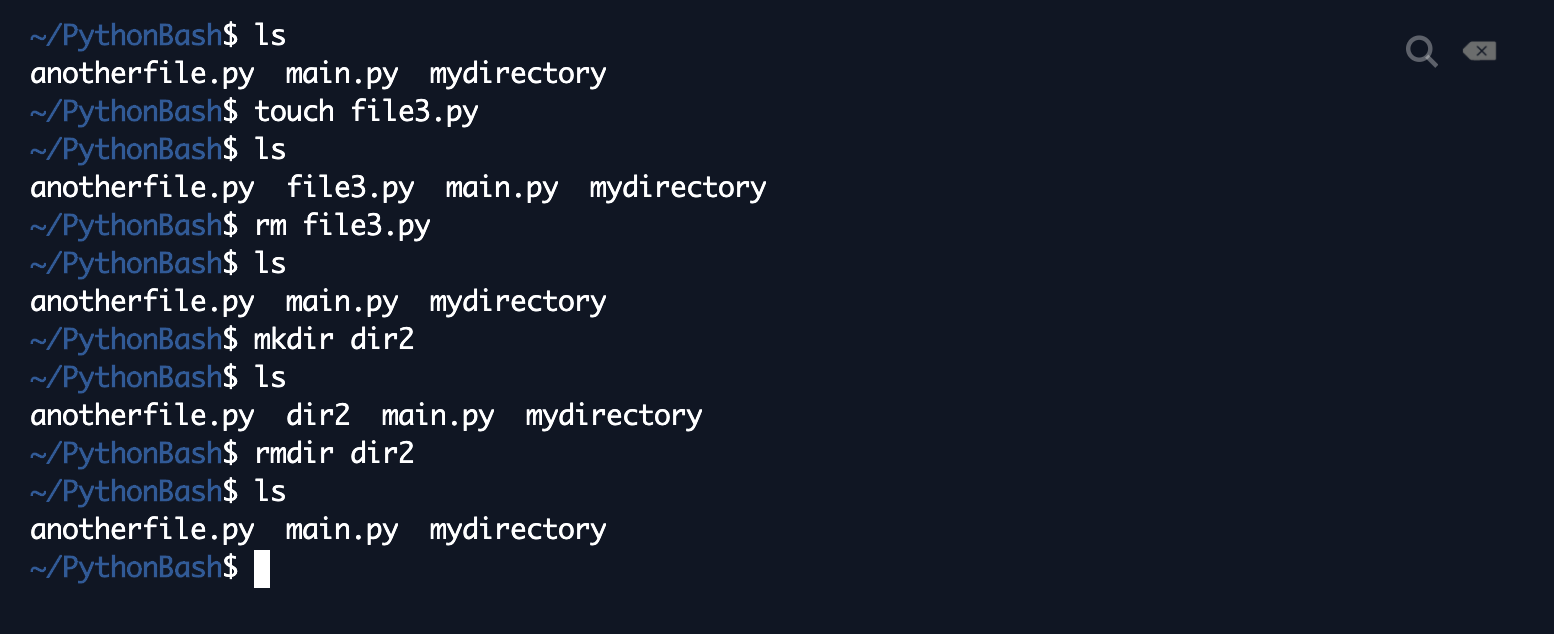 I type ls after every step to show how the contents of my directory have changed. First, I'm in PythonBash, and I have the directory mydirectory and the files anotherfile.py and main.py. Then, I create file3.py, and an ls shows that that's been added to the PythonBash directory. After that, I remove the file I just created, leaving the same contents as my original directory. A similar thing happens when I create dir2 and remove it. The last command that's essential for this tutorial is python3. It's not exactly a build-in Bash command, but it's important because it's the way you execute Python programs in the shell. python3 [yourFile.py] essentially executes the program in yourFile.py. It's the equivalent of pressing Run, but we can do much more with it, as we'll see in this tutorial. As an example, I wrote a program in main.py that just prints "Hello, world". Here's what happens when I run it in the shell:  Compare that with what you get when you hit "Run" (which, in repl.it, automatically executes whatever is in main.py). It should be the same! Those are all the commands that are needed for this tutorial, but just to be complete, we're going to talk about two more commands that are extremely common in Bash. First is mv, which stands for move. The syntax is mv [fileOrFolder] [whereYouWantItToGo]--the command basically moves a file from one directory to another (the equivalent of Move To in Google Drive. Similar to mv is cp, which stands for copy. It has the exact same syntax as mv, but the difference is that instead of moving the file, it makes a copy of the file in whereYouWantItToGo--so you end up with a copy of the file in both locations. Examples below: 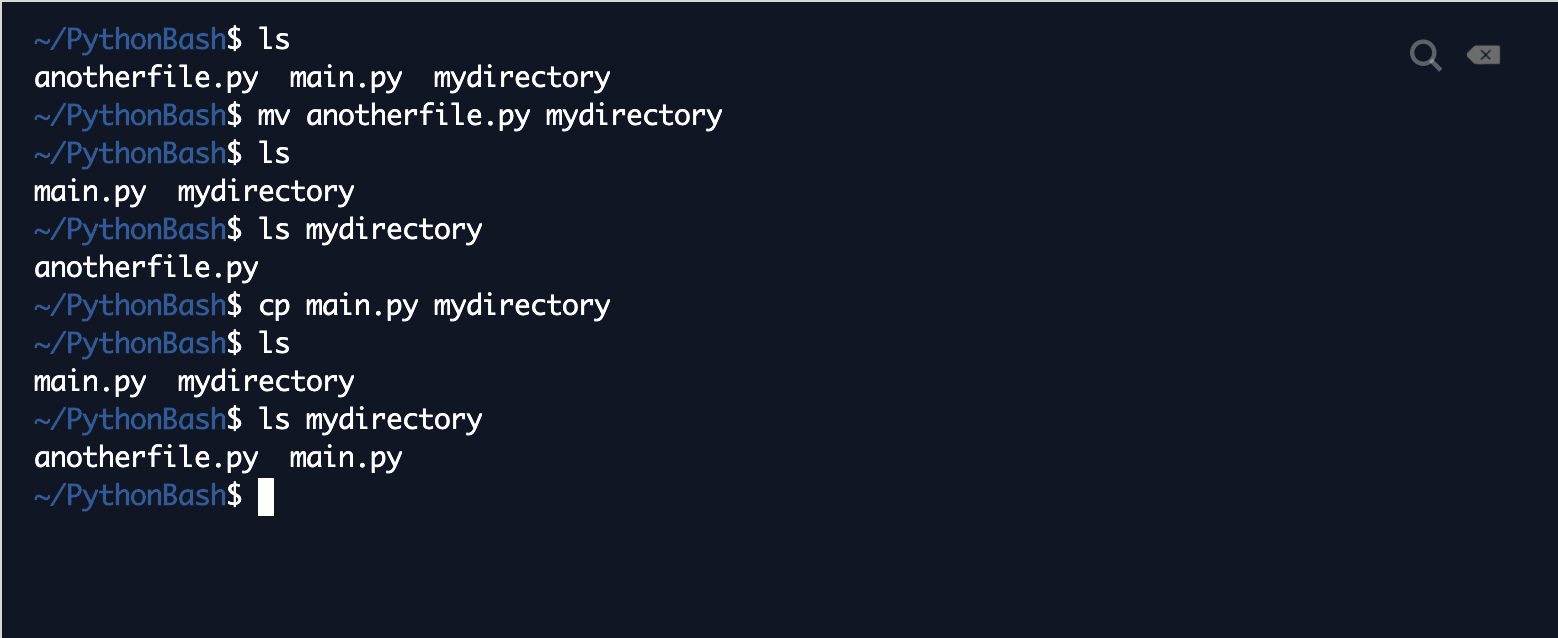 Per my first ls, I have anotherfile.py, main.py, and mydirectory in my PythonBash directory. Then, I move anotherfile.py into mydirectory. When I do another ls, anotherfile.py is gone from PythonBash! As seen in my next command, anotherfile.py has moved to mydirectory (note: ls [somePath] prints out all the files in directories that are in the directory specified by that path. There's a ton more ways to use ls, details here). Then, I make a copy of main.py in mydirectory. When I ls after that, you see that main.py is still in PythonBash, but there's also another copy of it in mydirectory! Those are all the essential Bash commands we'll cover today. Of course, this is just a cook's tour of the scripting language--there is so much more to Bash that we can't possibly cover in one post, but here's a link with more info and links to more Bash things. Onto Python! The Python: ReadingFor this part of the tutorial, we'll be working with generic .txt files (read "text files"), which just contain lines of text. First, let's create a sample text file that we'll use. You can do all of this manually, but just to practice our newly introduced Bash skills, execute "touch example.txt" in your shell, as in the example below:  Now, open up example.txt in your Files panel, and type in some random (> 1) lines of text. The example I'll use is below: 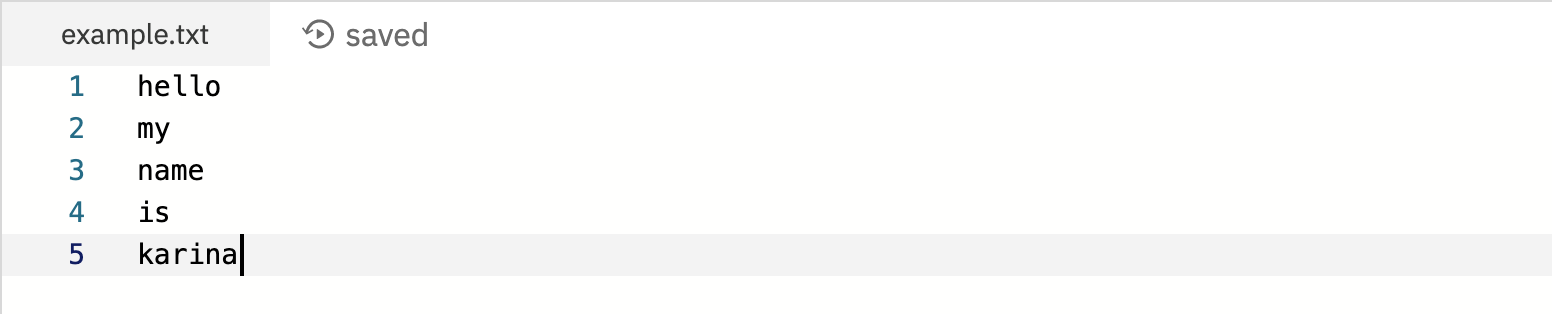 We're finally ready to write some Python! Open up main.py. The basic command to open a file in Python is...drumroll please...open. Very fitting! The syntax is open([filePath], "[mode]"). filePath is the (relative or absolute) path to the file you want to open, and the mode is a string with a few characters specifying whether you want to read the file, write it, modify it, etc. The "r" mode is the "read" mode, which means you can only read the information from the file, but you can't write anything in it or change it. To do things with the file, you'll want to save the result of the open() command to a variable, as below (type this, but don't run it yet): Now, the variable example contains the opened file "example.txt" in read-only mode. To actually read the file, the command is [fileVariableName].readlines(). Inside the parentheses, you can optionally specify the number of lines you want to read, but by default, it reads all the lines if you say nothing. Continuing our example, type the following (but still, don't run it yet): The first line reads the lines from the example file and saves them in a variable called lines. The second line is for our information--type(variable) tells us the data type of the variable in question. In this case, readlines() returns a list of all the lines, each of which is a string. Printing the type of a variable is a useful debugging tool if you want to see whether your code is failing because you're trying to apply some function on a variable of the wrong type. Finally, we can print the lines of the file by calling print(lines). Before we run this, we need one more line to make sure our computers don't explode: This does what it sounds like it does: it closes the file. If you don't close the file, all kinds of messy stuff might happen with your computer's memory--a full explanation would get into all the inner working of computer memory, which are not the focus of this tutorial, but just remember to close any files you open. Now, we're ready to run all of this code! You can totally just press Run on repl.it, but again, I'm going to practice our newly introduced Bash skills. Here's what happens when I run my example code:  As we can see here, readlines() gives us a list object. Each line is its own string element in the list, and the file reader also stores line breaks as newline (\n) characters. Now that we have all the file information in a list, we can do whatever we want with the information by just operating on lines as we do on any list, so that's it for file reading! The Python: WritingOther than reading files, we might also want to create them! In Python (and in general computer land), this is known as writing files. As with reading, you'll first want to open the file with open([fileName], "w"). The "w" stands for write, indicating that you'll be writing to this file and not reading it. You can name the file whatever you want, since you're creating it! Then, the command to write something to the file is [yourFile].write("[whatYouWantToWrite]"). Try the following code in main.py (just paste it below where you left off): Here, we introduce another piece of syntax, which is the with command. The above code is essentially equivalent to the following, but it's just much cleaner, and it takes care of closing the file for you once you exit the indented block: Run either one and see what happens! Here's what I get when I open up "written.txt" after running the code above:  The takeaway here is that .write() writes exactly what you tell it to, no more and no less! If you want these two words to be separated by a newline, you need to say that! Having separate write() commands won't do the trick for you. Modify the code as follows and rerun: Here's the output of written.txt now--much better!  There's just one small problem here--this code worked for our purpose, but what if we had a file already and wanted to add onto it or change it? Opening an existing file in "w" mode essentially deletes what's already there and re-creates the file, so it overwrites the previous version of the file. To add onto a file, we have to open it in "a", or append mode. See it in action by running the code below: Code Editor
Here's the resulting file:  As you can see, we've appended "more" and "words" onto our existing file. Just to drive this point home, change that "a" to a "w" in the code above to see what happens. Here's what I get:  From this example, we see that even if you create a file and open it with "w" mode twice in the same program, the whole file gets rewritten every time you call a new open()! So, be sure to use "a" mode when you want to modify a file, and when you want to write separate new files, make sure to name them differently! We can easily extend the functionality of write() to write entire lists (or any iterable object) to files. Simply use a for loop! Example below: Code Editor
Here's the output: 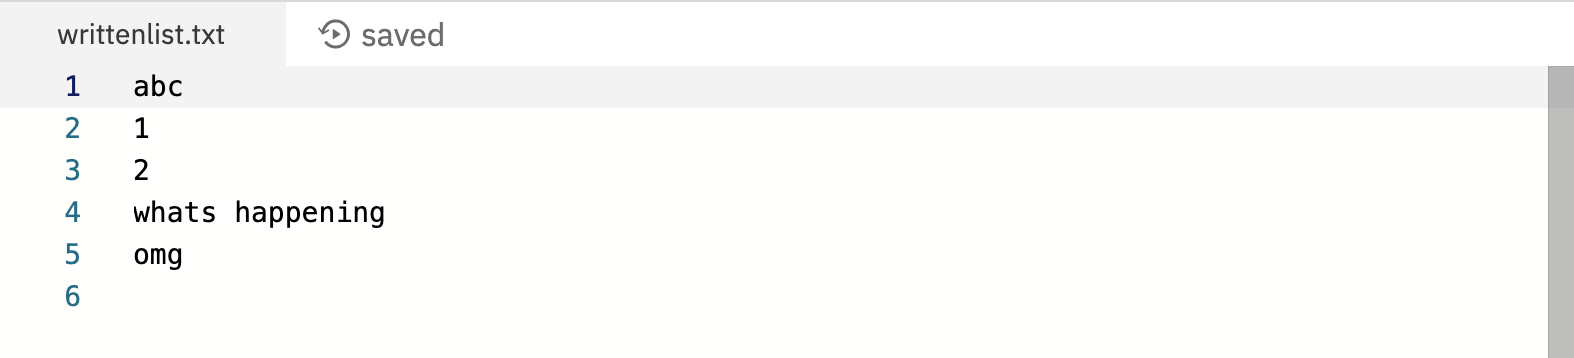 What we've done here is iterate through each element in our toylist, cast it as a string, concatenate it to a newline character to make sure we're getting our line breaks, and write it to writtenlist.txt. One last note: notice how we don't have any problems when we use outfile as our file variable for every single one of these with _ as _ statements. This is because the variable name outfile only has scope (basically, can only be seen) within the indented block of the with _ statement. Once we exit the statement, outfile has no meaning, and it can be reused however we want. That's it for basic text files in Python! Again, we by no means claim to cover everything there is to know about file I/O, but this should be a decent overview of the fundamentals that are useful in data science, machine learning, and computational linguistics. Now, we'll introduce a couple of special file types that are often dealt with in data analysis. Special Files: JSONJSON stands for JavaScript Object Notation, and it's a useful tool and file type to store data that comes in the form of dictionaries. It was invented based on the JavaScript programming language, but the core idea of it is so powerful that it's been extended to several other languages, including Python. In fact, it's extremely useful not just for dictionaries, but for any data whose structure (lists, dictionaries, etc) that you want to preserve as more than plain text. It might be somewhat easier to introduce JSON file I/O by writing a file first. To do this, we'll start by importing Python's json package (the package that contains all this fun functionality allowing us to process JSON files) and creating a sample dictionary. If you're not familiar with dictionaries, we have a section on it in our previous blog post. Feel free to just add onto main.py, but to practice working with multiple files and Bash commands and separating code for different tasks, I'll do the demo with a new file called jsonpractice.py. You can create this file by entering touch jsonpractice.py in your shell. Code Editor
From here, let's say we want to dump all this information in a file. One way to do it would be to cast toydictionary as a string and write it to a text file, but what if we wanted to load it up again sometime in the future and access it as a dictionary? Converting strings to dictionaries is really complicated to do manually (it gets even more complicated if we have large amounts of code that might be in different programming languages), so that's where json comes in! In anticipation of this future need, we're going to write our dictionary to a json file instead. The command for this is json.dump([dataName], [fileObject]) (source here). Add the code below to jsonpractice.py and run it using python3 jsonpractice.py in your shell: Code Editor
Here's what I get:  Essentially, we've copied the entire data structure and written it into a file. We can also write the data to "toydictionary.txt", but as you'll see if you do that, plain text isn't as colorful as json--it's easier to see the keys, values, and different data types when you tell the computer to specifically interpret your file as a JSON object. Now, let's read some data! The command for this is json.load([fileObject]). Code Editor
Essentially, json.load() turns a JSON file into a dictionary object, which you can then call and manipulate just like any other dictionary! Pretty magical! Here's the output when I run this code:  As expected, we see that toydictionaryrecovered is of type "dict" (dictionary). When we call its "name" and "age" keys, it returns the correct values! JSON can be used to load lists of dictionaries, dictionaries of lists, lists of dictionaries and lists, and much more! The beauty is that it magically interprets the data structure for you so that you can call operations on it without worrying about converting back and forth. Here's an example with a list, of which one element is a dictionary: Code Editor
Here's the resulting file:  And here's the shell output: 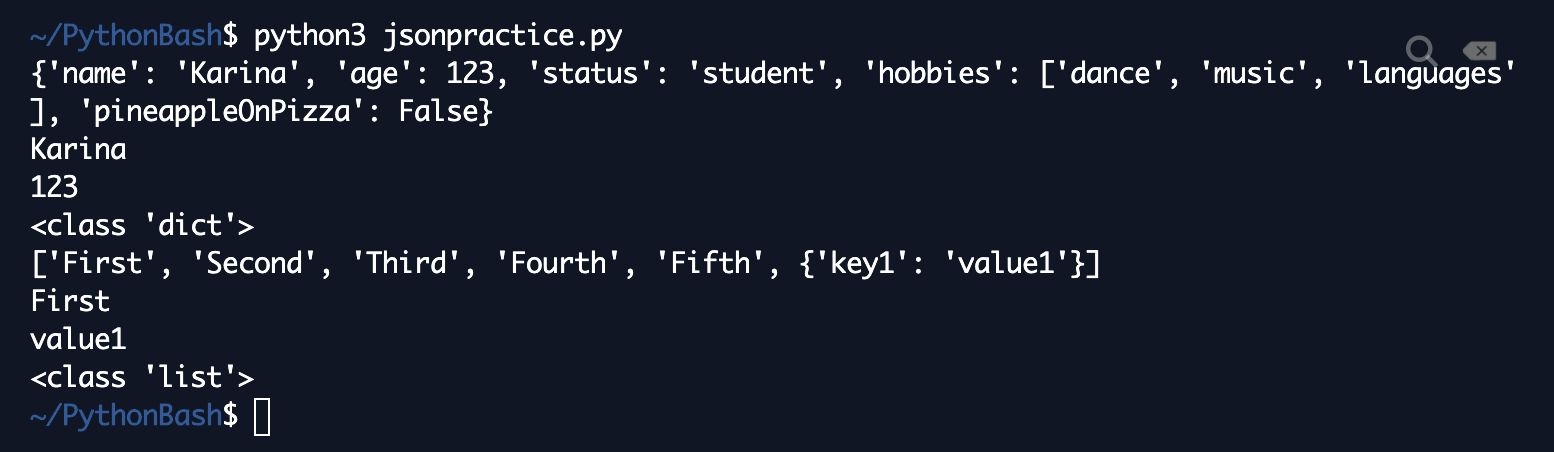 As expected, JSON interprets our toystructurerecovered as a list, and it interprets the last element as a dictionary, as shown by the fact that it can correctly print out the value of "key1" in the lists's last element. That's it for the basics of JSON! You'll find JSON useful when you're dealing with data that comes in a variety of different formats, including API dumps, news article dumps, and various other types of information. Special Files: CSVAnother common file type in data analysis is the CSV, which stands for comma-separated values. This is what it sounds like--each line has a bunch of values, and they're separated by commas. Let's create a sample CSV. First, run touch example.csv in your shell to create an example.csv file:  Then, open up example.csv, and enter some data that's separated by commas. Here's an example:  Unless you do some fancy manual processing, make sure to not include any extra spaces in your data. In practice, you'll often be converting different forms of data into CSV format or downloading a Google Sheet in CSV format, and most of these conversion programs do the comma separation for you, but we're just showing you how a properly formatted CSV should look like without any fancy display tools. Now, since CSV's are so special and common, Python has its own package to handle them as well! It's called...csv. Fitting, yes. We'll want to start by importing that package. To practice these Bash skills, I'm going to do all of this on a new file called csvpractice.py. To read a CSV, we'll first want to open() the file in "r" mode as before. Then, we'll use the csv.reader([fileObject]) command to read it. Example code below: Here's what happens when it's run:  Notice that lines is not a list! When we use CSV, we'll have to do one extra step--cast the reader object as a list. Modify the above code as follows: Here's the shell output:  As shown here, CSV interprets each line of the file as its own list, and it separates the elements correctly by comma. We end up getting a list of lists! Now, let's write a CSV! In this toy example, we'll just regurgitate what we read from the file originally. The object we use here is the csv.writer, and the command to write a list as a line of a file is writerow. Here's the code: And here's what regurgitated.csv looks like - the CSV formatting is done automatically!  There are fancier packages with which to read and manipulate CSV files that we'll cover in the next few posts, but this is it for the basics for now--once you've loaded a CSV into a list, you can mess with it as you mess with lists! User InputThe next topic for this tutorial is user input, which is key to making your programs interactive. User input is what it sounds like--getting input from the user of your program. The command for getting user input in Python is...input. We love intuitive function names! More specifically, the syntax is input("[message]") if you want to display a message, or prompt, so the user knows what to actually input. Here's an example asking a user for their name and then printing out a greeting (inspiration from here)--I'll switch back to main.py for this section: Code Editor
What this code does is display the message "What's your name?" with a newline, wait for the user to enter their name, and print the greeting, customized for them. Here's an example of the output:  Now, name is just a string (by default, all input is collected in string form). You can manipulate it just like you manipulate any string! What To Do When Things Go Wrong: Error HandlingTheoretically, you can control your own code so that nothing goes wrong. However, when you're passing in external files or taking in user input, things get a lot riskier, as you can't always control the input. To anticipate these types of situations, you'll want to do some error handling--again, literally what it sounds like--handling errors (fancy computer word for "when stuff goes wrong"). As a disclaimer, you can only handle run-time errors, which are errors that happen while your code is running (better explanation here). There are some errors like syntax errors (computer equivalent of grammar errors) that can't be handled because your program simply won't run when there are these errors. Here's an analogy: let's say I tell you to "open the ground." This is grammatically correct--you're applying an object to a verb. However, it doesn't make sense because usually, you can't just crack open a slab of concrete. At least, chances are that the ground beneath you can't just be opened without drastic financial and legal consequences. This is kind of like a run-time error because it's linguistically sound and theoretically doable, but when you actually try to go do it, something will go majorly wrong. Now, suppose I tell you to "akdsuhfake the asuhfdaj" or to "notebook speak the." In the first case, two of the three words aren't even English words, and in the second case, "notebook" isn't a verb, "speak" isn't a noun, and "the" is in the wrong place. You basically can't even begin to decipher what I mean because these commands aren't linguistically sound! These are more like syntax errors because you can't even execute on these commands in theory. In Python, syntax errors are like forgetting to indent something, forgetting to put a colon somewhere, having one more opening parentheses than closing, etc. The computer simply can't interpret your code if you do that. Runtime errors are things like dividing by zero, input being in an unexpected format, etc--you don't know that these things have gone wrong until you've actually run the code. In other programming languages, syntax errors belong to a broader class of compile-time errors (basically things that go wrong that prevent you from even running your code, precise explanation here), but Python isn't a compiled language, so that concept doesn't really apply here. Disclaimer aside: we have ways to anticipate potential errors in Python! The fundamental strategy is to use try and except. You basically try to do something, and if something goes wrong, you execute a Plan B by excepting that error and responding in some form. Here's the syntax with an example (also just in main.py): Code Editor
Here, we're saying, let's try to divide three by zero. If we can do that, then let's print out a message indicating success. If we can't, we'd ordinarily just crash the program (try running x = 3 / 0 by itself to see what happens!), but in this case, we're going to catch that mistake and print a different message instead. This code will print "Can't divide by zero". Here's another example, where things might go awry with user input. Read through the code and check your understanding with the little quiz below! The answer and an explanation will pop up once you submit the quiz. Code Editor
Command-Line ArgumentsOur last topic for this tutorial is command-line arguments, which are basically like function arguments, but the functions are command-line commands. You've actually already seen some of these! For example, when you run a file with python3 [yourfile.py], yourfile.py is a command-line argument to the python3 command because it's the thing that the python3 command is being applied to! In the shell, arguments are separated by spaces (for example, mv myFile somewhereElse), so when you want to actually type a space (try to avoid it, but if you must), you need to precede it with a \ first. We can also integrate command-line arguments into Python programs! Below, we describe two ways in which we can do this. For Level 1, I'm going to make a new file called cla.py. How to Write Them: Level 1The package that handles command-line arguments is called sys (stands for system). We're going to start by importing this package. Code Editor
The object that accesses the command-line arguments is a list called sys.argv. Let's start with a basic example: Code Editor
After you type this code, run python3 cla.py. Here's the output:  This shows what sys.argv stores: a list of the command-line arguments. The first command-line argument is, well, the name of the file we're running! Now, let's add some more arguments in a more complex program. Don't run it just yet. Code Editor
Here, we basically want to take in two additional command-line arguments and compute their sum (it's kind of a form of user input, if the user wants to use Bash). An important thing to note here is that the elements of sys.argv are strings by default, so we need to cast them as integers or as whatever data type we need them to be (clearly lots of room for error handling here). In the next section, we'll run this program with some example arguments. How to Run Them: Level 1Recall that command-line arguments are separated by space. So, to run this program, simply run: python3 cla.py [first number] [second number]. Example run below:  Works as expected! Now, you can get by with sys.argv for most things. For simple programs, it works just fine. However, there's a lot of room for error, and there's a lot to keep track of. For example, things will go wrong if you enter your arguments in the wrong order, miss one argument, or maybe have too many arguments. You also have to keep track of which index every argument is at, which can get frustrating if your code becomes too complicated or if you're working with multiple people in multiple iterations. Nothing here is fatally wrong with sys.argv, but it just seems really stressful. Below, we'll introduce another command-line argument handling system that relieves some of this headache. I'm going to start another file called cla2.py for this section. How to Write Them: Level 2Python has another wonderful package called argparse, which stands for argument parser. Parsing is computer-speak for deciphering code (computer equivalent of figuring out what somebody's saying). We'll start by importing this package and creating an instance (kind of like a copy) of the parser (source: I'm getting most of this code from here). Code Editor
The instantiation takes in an argument called description, which can be set to a string that describes what your parser does. Now, for all the arguments we want to keep track of, we're going to use the parser.add_argument function to do so. Examples below, with explanations to follow: Code Editor
The add_argument function takes in several arguments. The first argument is the name of the argument--so unlike with sys.argv where you can only access arguments by their indices, you can actually keep track of arguments here much more intuitively! The name is just a string that's whatever name you want your argument to be. The -- in front of the name specifies that the argument is optional (i.e. it doesn't have to be entered by the user, but it also totally can). So, number1 is required, but number2 is not. The next argument is metavar, which is basically a nickname or a name that you want to show to users. When a user runs a program and asks for help, the help message will display the name of the argument as its metavar (more on that below). Next, we have the type, which decrees the data type that we want our argument to be. In this case, we'd like to have an integer. This gets rid of the need to cast string arguments as different types! After that, we have a help argument, which is a string that is a message that gets displayed when the user running the program asks for help (more on how to do that below). Finally, a pretty common optional argument is default, which specifies what the value of the argument should default to if the user doesn't enter it (for programs that have some non-critical arguments, this saves the hassle of having to have the exact number of arguments that sys.argv would look for). There are also several other arguments that add_argument optionally takes in (full documentation here), but these are the most important ones for now. Now that we've added our arguments, we're going to parse them. This is just syntax to remember--parser.parse_args() basically feeds the parser's arguments into a parsing machine and gets them ready for other things to be done to them. Let's do some stuff with these arguments! We're going to build an adder--given number1 and number2, we want to print out their sum. If number2 isn't specified, we'll assume it's 0, as per our default value (we couldn't do this directly with sys.argv without try/except, but this is much cleaner). Copy the code below, but don't run it just yet. Code Editor
How to Run Them: Level 2Running programs using argparse requires a bit more fancy jargon, so we're here to break it down. The general rule for running a program using argparse is to flag the optional arguments and not flag the required ones. Normally, the convention is to type python3 [yourFile.py], followed by all the required arguments, followed by all the optional arguments. It also works if you type all the optional arguments followed by the required arguments, but it's usually easier on the head if you do it the other way around. Here's an example:  As expected, this program returns the sum of 5 and 4. This is what we mean by flagging optional arguments. To let the program know that we're including the optional argument, we need to precede it with --number2 to let it know it's coming. python3 cla2.py 5 4 wouldn't work! On the other hand, we don't flag the 5 that is number1--flagging it would cause an error! Here's how it works in the other order:  We get the exact same thing! Now, here's what happens when we just don't include a number2:  number2 defaults to 0, so when we don't specify it, the program just returns number1 + 0, which is just number1! Finally, if you (or some other user of your program) forget how to run your program, this is where argparse can save your life. Run python3 [yourfile.py] --help. 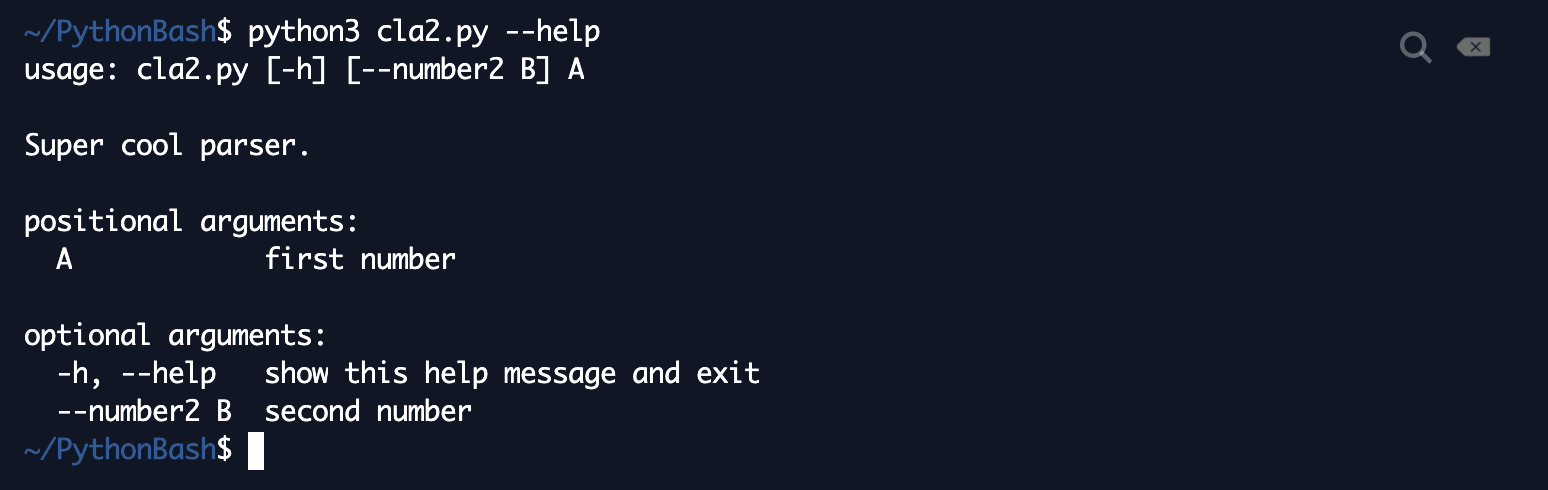 This is where the help arguments that we specified in our program come in handy! This --help method prints out a super helpful message with instructions on how to use your program (i.e. how to input and flag arguments), which arguments are required, and which arguments are not required. It can definitely be super extra to use argparse for simple programs like adding two numbers, but with a lot of machine learning papers and software that is generally more complex than our toy examples, these extra functionalities in argparse become extremely helpful. You'll see them everywhere in publications and software releases! Wrap-UpThanks for making it to the end of this tutorial! We hope you found this post helpful. To recap, we've covered:
All of the code from this post can be found in one place here. Up next, we'll cover some powerful packages that can process, analyze, and manipulate data in Python. If you've made it this far, we'd really appreciate it if you could take a moment to fill out our guest book here to let us know that you've read this post and give us any feedback (as always, the form is totally anonymous, and all questions are optional). To be the first to know when more content comes out, subscribe to our newsletter here. We're also constantly updating our post from May 15th with new resources, and we've just added some resources for education and action here. Finally, all of our blog posts can be found here. Thanks for reading! Welcome to LingHacks' first tutorial blog post! We thought we'd kick off this series with our rendition of an introduction to the Python programming language. Python is especially popular, useful, and powerful in machine learning and computational linguistics, and most of our subsequent tutorials will use it. Some notes: This tutorial is meant to be accessible to everyone regardless of programming background, so the content spans a few different levels. As such, we've organized the content into sections by topic, so feel free to skip around if you know some of the content but want to read up on other topics. Throughout the tutorial, we've also included some check-your-understanding quiz-type questions for you to fill out--these forms don't collect any of your personal information, so they're just there to help you better understand the material (answers and explanations will pop up after you submit the forms). Lastly, this tutorial is by no means comprehensive--it's just meant to survey some of the basic concepts of programming and get you familiar with Python fundamentals. We would also really appreciate it if you could fill out this guest book form to let us know that you've checked out this post and give us any feedback you might have! Some Background on Programming and PythonFor those with no background, programming, in a nutshell, is telling a computer what to do. A program, then, is a set of instructions for a computer. It's similar to a set of instructions for a human, but programming is much more rigid and specific than typical human communication because at the lowest level, computers can only interpret a set of bits (ultimately electrical signals) that they mechanically turn into output. Examples of programs you have likely encountered in everyday life include calculator commands, smartphone applications, and laptop or desktop software. All of these follow a common pattern--there's a specific set of steps you take to activate them, and they produce a specific set of output given your input. If your devices are fully charged and functioning properly, these programs will also be accurate and obedient--they won't talk back to you or try to mislead you, as humans might. Just as there are a ton of different human languages, there are also a ton of different programming languages--you might have heard of languages like Java, C++, R, SQL, etc. Each language has its advantages and drawbacks for particular applications. Python is one such programming language. Some of the advantages of Python include the fact that it is one of the more English-like languages, making it easier to read and understand and more accessible to beginners, and that it has many powerful applications in data science, artificial intelligence, machine learning, and natural language processing--which is why we use it in most of our curriculum! That said, some drawbacks of Python include the fact that it is, on average, slower than some languages like C or C++ because it is a higher-level, interpreted language. These terms may not be familiar to you, and they aren't the focus of this tutorial, but in short: the higher-level a programming language is, the more it reads like English and covers up what's going on with the zeros and ones at the core of the machine. The lower-level a programming language is, the more it reads like machine code (in broad strokes, zeros and ones, which are less humanly comprehensible than English). Programming languages can also be either interpreted or compiled - they're basically two different ways in which the code is run by the machine (more on that here). In most basic programming tasks, these factors shouldn't be of too much concern, though as your programs get more complex, they become increasingly important--full course materials on basic systems and architecture, which cover how exactly computers work and run code, can be found here and here. Just like each human language has its unique grammar, each programming language has a unique syntax--a specific way in which its commands need to be written in order for the machine to comprehend them. These syntax rules are usually arbitrary--they don't really follow an algebraic or otherwise mathematical logic--so don't worry if the rules seem unintuitive; syntax is something you have to just accept. Google and the Python documentation will often be your best friends if you're unsure about any particular syntax! Running Python: Installation and Environment StuffIf you've run Python code before, have a favorite text editor, know how to run Python code, etc., feel free to skip this section. If not, here are some of our recommendations for running, or executing, Python programs. The focus of this tutorial is to get you writing and running Python code as fast as possible, so we won't go into installing Python on your machine in this post. In future tutorials, programs might get more complex, and we'll write out some recommendations for software for those tasks. For now, simply open up this link! The link should create a new Python 3 workspace for you on a site called repl.it, and you should just be able to type code, hit run, and see the output. Python 3.8.2 is the latest version of the Python language, as of the time that this post was written. Repl.it is an online code editor that lets you run code in several programming languages with no installations on your local machine - it's a great way to try out some basic and intermediate programming! If you'd like to save your work, just create an account on the site. Now, we're ready to dive into some actual code! VariablesThe first basic programming concept we'll introduce is the concept of a variable, which can be defined as something that stores data. It's somewhat similar to a variable in algebra, like x = 2 or y = 3. To declare a variable in Python, name it anything you want, type an equal sign, and then type the value of the data that you want to store under it. In Python, it's proper convention to begin your variable names with a lowercase letter and to only include letters, numbers, and underscores in the name. Here's an example of a basic variable (just paste this code into your repl.it workspace and hit "Run" to run it): In this example, we've defined a variable called myFirstVariable and stored the value of 5 under it. The value of 5 is an example of an integer, one of several data types found in Python. Other data types include floats (decimal numbers), strings (sequences of characters), and booleans (true or false). The reason we have data types is because there are some commands that don't make sense with certain data types (intuitively, how would you add together an integer and a string? How would you take the average of "abc" and True?)--more on this coming up. In this example, we've also introduced two other important pieces of syntax. The first is the comment, which is text that is there to help readers of your code understand what's going on but that doesn't actually contribute to the code. In Python, we use the pound symbol (#) to begin a comment on one line. So, the # int doesn't actually run any code--it just lets us humans know that 5 is an integer. As you write more and more complex code, it'll become increasingly important to comment it properly so others (and also you, perhaps at 3 am when revisiting a file you haven't touched in 12 months) can understand what's happening. The second piece of syntax is the print() statement, which is Python's way of logging the code's output to the console (fancy-speak for showing humans what the code outputs). The console typically refers to the terminal--this will be the right hand side panel in your repl.it workspace. Notice that if you just run the first line, nothing happens. To output anything onto the console, you need to print it! In this case, the print statement will print 5, since that's the value stored in myFirstVariable. Now, let's take a look at some examples of other data types in action. To run this code, paste it below where you left off in your repl.it workspace. Above are examples of floats, strings, and booleans. A few things of note:
Basic OperationsNext, we'll go over some basic operations on these data types. Python supports all the common number operations: addition, subtraction, division, multiplication, floor division (rounding to the greatest integer less than the result of division), and modulo (remainder after division). Examples below (again, paste and run!) First, we define some variables. Note the new piece of syntax: the semicolon is not at all required in Python (unlike some other languages like JavaScript, Java, C/C++, etc), but if you want to write multiple lines of code on one line in your editor, you'll need to separate each of them by a semicolon. As shown in the code, Python's arithmetic operation syntax is pretty intuitive, and it's pretty similar to how you would write it in math. Addition is represented by the + symbol, multiplication by *, subtraction by -, division by /, and floor division by //. Exponentiation is represented by **, so x ** y is x raised to the power of y. The modulo operation is represented by the % sign, so x % y is the remainder when x is divided by y. Another new piece of syntax: the str() operator converts its input to a string, and the + operator, when used on strings, concatenates them, or strings them together (pun intended) into one big string. This is an example of why data types are important: 1 + "x" makes no sense (which + is it referring to?), while str(1) + str("x") makes perfect sense (it outputs "1x"). So, remember to convert all of your data to strings using str() when you want to print it out or concatenate it onto another string! One more syntax trick: to increment a variable via addition, subtraction, multiplication, or division, a shorthand is to write myVariable += [desired value], which is equivalent to myVariable = myVariable + [desired value]. You can do the same for subtraction with -=, multiplication with *=, and division with /=. The += operator also works on strings, so you can concatenate a string onto an existing string. Boolean LogicBooleans might seem like just another data type (which, technically, they are), but they are actually very powerful and deserve a whole section of their own. This is because, as we'll see in a few sections, booleans are the foundation of interesting code--with booleans, you can tell the computer to only do something if something is true or to do something else if another variable is false, rather than just running one entire program through no matter what. Below are some examples of boolean operators: The first operator we see is ==, which compares whether two variables are equal. For example, 4 == 5 is false because 4 is, well, not equal to 5, while 5 == 5 is true. Importantly, make sure not to confuse == with =. The first one is an equality comparison, and the second one is an assignment of a value to a variable (if you say myBool = (4 = 5), you will get an error). The == operator accepts pretty much any data type (even strings). Some other operators include < (less than), <= (less than or equal to), > (greater than), and >= (greater than or equal to). These operators basically do what they do in math, and they only work on integers and floats for obvious reasons. There are also a few other operators that only accept booleans. First is the and operator: x and y is true if both x and y are true. Since myFirstBool is false, myFirstBool and mySecondBool will be false as well. Next is the or operator: x or y is true if either x or y is true. So, since mySecondBool is true, the fourth print statement above will come out to True. Lastly, we have the not operator, which basically flips a boolean--so not True is False and not False is True. Hence, not myFirstBool is True. Finally, we'll often want to mix and match these operators. In math, we have PEMDAS because the order of operations can be unclear at times, so we have these rules to untangle it. In programming, we also have an order of operations: arithmetic operators get evaluated first according to PEMDAS, then equality and comparison operators, and finally boolean operators. Within boolean operators, the not operator gets evaluated first. The order of or and and does exist, but it can be hard and unnecessary to remember (especially since some programming languages might have it flipped). To work around this, just remember the P in PEMDAS--if you want to evaluate something first, put it in parentheses, as we did in the last example. This actually applies for any of the operations mentioned here--if you forget or are unsure of the order of some operations, just use parentheses to make sure your expression evaluates the way you want it to! Of course, you should only do this within reason, as excessive parentheses are often annoying to readers (though usually not programmatically incorrect), but it's good (especially as a beginner) to err on the side of more parentheses to make sure your code is at least correct. ListsThe data types we've gone over so far (with the arguable exception of strings, which will be discussed later) can be considered primitive data types--essentially the basic building blocks of data in a programming language (more precise definition here). Using these primitive types, we can then build more interesting and powerful data structures, roughly defined as ways to store and organize data (more precise explanation here). The first common Python data structure we'll go over is lists, which are basically what they sound like--ordered collections of things, much like to-do lists, competition rankings, cast lists, etc. In Python, lists are enclosed in square brackets, and elements (things in the list) are separated by commas. Lists can contain different types of objects, including lists (these are commonly called nested lists)! Some examples below: The code above shows just a few of the many things we can do with lists. We first initialize (fancy word for creating an object/piece of data) our first lists as a list of numbers under myFirstList. Then, we can use the len() function to get the length of our list, which is just the number of elements in it. We can also call a particular element of our list using its index, which is a number denoting what place in the list the element is at. In Python, we start indexing at zero, and the syntax for indexing is nameOfList[index]. So, myFirstList[0] refers to the first element in myFirstList, which will be 1. myFirstList[1] will then be the second element of the list, which is 2. We can also index backwards in Python! In this case, we start with -1, which represents the last element in the list. We can also pick out multiple elements of lists using indices. One operation we can do is called slicing, which is selecting a chunk of a list. We do this using the syntax listName[startingIndex:endingIndex], which selects the chunk of the list starting at the startingIndex and ending one element before the endingIndex (i.e. inclusive of startingIndex, exclusive of endingIndex). For example, myFirstList[1:3] gives us a list of the elements in myFirstList starting from index 1 and ending just before index 3--in other words, it gives us the second and third elements of myFirstList. Extending this idea, we can get the first n elements of a list by saying listName[0:n], and we can get elements at index n through the end of the list by saying listName[n:len(listName) - 1]. However, Python recognizes that this is sometimes annoying to type every time. So, it lets us use a shortcut, where we can omit the 0 and the len(listName) - 1. Hence, listName[:n] gets the first n elements, and listName[n:] gets the last chunk of the list starting from index n. Another cool trick with indices is that we don't have to select all the consecutive elements in a chunk of a list--we can skip elements! When we say something like myFirstList[0:4:2], that gives us the elements of myFirstList from index 0 to 3, skipping by 2's (i.e. every second element, starting with the one at index 0). We can skip by any number of elements using this syntax! Using indices, we can also change specific elements in lists. This is because in Python, lists are mutable (fancy-speak for "things in a list can be changed"). When we call myFirstList[3] = 5, we're changing the 4th element from its original value of 4 to its new value of 5. When we then print myFirstList, it'll reflect this change. A side note: we can print lists in Python by just casting them as strings, as we do primitive data types! We can also change lists by adding and deleting elements from them. Examples below: First, we can add elements to the end of a list by appending them, as we do in the first line. Our new list is just our old list with the new element, 5, tacked on at the end. Now, what if we want to add something to the list, but not at the end (e.g. what if you have a dentist's appointment between soccer practice and dinner)? Never fear! This is where the insert method comes in. The syntax listName.insert(x, y) means that you insert the value y at the index x in listName. So in the example above, you insert the number 6 as the fourth element in the list, and every element after it in the original list gets bumped forward one space to make room for the new element. What if it rains, and your soccer practice gets canceled? You might then want to delete an element from your list. There are two ways to do this in Python. One is to use the pop method, where you specify the index of the element you want to delete. So, pop(1) deletes the second element of the list and moves everything after it back one space. The neat thing about pop is that it also stores the element that you deleted. So, if you assign someList.pop(someIndex) to a variable someVariable, someVariable will give you what exactly you deleted. This can be useful if you later want to reschedule your soccer practice or in any situation where you might have some use for an element that you delete from a list. If you know you don't want to store the deleted element, you can also use the del method, which has a bit of a different syntax, where you specify the list and the index (essentially, the element) that you want deleted. So, del myFirstList[0] deletes the first element from the list. A few more fancy things you can do with lists include reversing them and nesting them. Examples below: The .reverse() method does what it sounds like it does--it takes a list and reverses it! As mentioned briefly before, lists can also include other lists as elements, as in the example above. To get elements of sublists, just index twice. The [0] in listInList[0][1] tells us to get the first element of the big list, which is the list [1, 2, 3], and the [1] tells us to get the second element of that list, which is 2. Importantly, the length of a list of lists (potentially mixed in with other elements) is the number of elements in the outer list, not the total length of the inner lists (so 3, not 9)! Some of these operations might seem trivial with these toy examples, but they'll become increasingly useful when you're working with large datasets that are often represented as lists! StringsNext, we'll go over strings--just sequences of characters at a first glance, but actually super interesting and complex! In some languages, strings are data types that are not primitive because they're really lists of characters (letters, numbers, symbols, etc). However, in Python, the line is a little murkier and more abstract, and strings and characters are ~essentially~ treated the same way. Because they're essentially lists of characters, strings are also strikingly similar to lists! For example, we can index them and calculate their length in the same way. Some string operations: We first initialize a string under the sentence variable. One cool thing we can do with a string is to split it into a list of words, sentences, letters, or really any type of chunk we want. We do this using the .split() method. By default, it splits by the space character, so it'll split up our sentence into ['I', 'love', 'natural', 'language', 'processing.'], but you can also specify what you want to split by. For example, someString.split(",") would look for commas in the string and split by those (e.g. "1,2,3,4".split(",") gives us ["1", "2", "3", "4"]). If you're familiar with CSV (comma-separated value) files, this is basically what they do when they're given strings of data! To reverse the split operation, we can also join a list of strings back together. The syntax for this is [character].join(yourList). This takes every element in yourList and concatenates them consecutively while inserting [character] in between each element. In our example, ' '.join(splitSentence) takes every string in splitSentence and concatenates them together with a space in between each component string. Strings can also span multiple lines! To indicate this, use triple quotes to enclose your string, as we did in myMultilineSentence, and just press enter when you want a line break. Triple quotes can also be used for multiline comments--the # only works on a single line, so if you have a really long comment, put it in triple quotes! There are also some whitespace characters and metacharacters worth noting. As we briefly mentioned when introducing strings, quotation marks and apostrophes need to be escaped when you want to include them in an actual string because they're used to enclose strings. Quotation marks and apostrophes are examples of metacharacters, which are basically characters that do something functional in the programming language. Whitespace refers to literal white space--spaces, tabs, new lines, etc. To indicate a new line, we use the \n character, and to indicate a tab, we use the \t character. Pressing enter and tab on your computer won't work, so that's why these special characters were created! DictionariesAnother powerful data structure in Python is the dictionary: in broad strokes, it's an unordered collection of pairs of keys and values. In human terms, a key is some sort of reference, name, or identification, and a value is a piece of data that the key refers to. In Python, dictionaries are written with curly braces ({}). Keys are strings, and values can be any type. Keys and values are separated by colons, and elements are separated by commas. Examples below: The keys of myFirstDict are 'chocolate', 'cheese', and 'vegetable'. The value stored under 'chocolate' is the string 'yes'. To grab a value in a dictionary, reference it by key as you would reference an element of a list by its index. For example, myFirstDict['chocolate'] would grab the value 'yes'. To add an element to a dictionary, simply initialize it using someDictionary[newKey] = newValue. Python will figure out if that key is already in the dictionary--if it is, it'll change the value to your newValue, and if it's not, it'll add that pair into the dictionary. To delete an item from a dictionary, use the del method. It's essentially the same as the del method for elements of lists--just specify the element of the dictionary you want to delete! Again, this toy example might not be that interesting, but a lot of data can be stored in the form of dictionaries--including news feeds, databases of people (e.g. students in a school, employees at a company), and pretty much any scenario where you want multiple pieces of information about a single thing! Counter: A Special DictionaryA special type of dictionary that is useful in data analysis is the Counter. Essentially, a counter takes in a list and gives us a dictionary where the keys are all of the elements in the list and the values are how many times they occur. An example is below. For this code, you'll want to type the from collections import Counter statement at the very top of your file, and then type the rest of it below where you left off previously. This is because Python syntax specifies that import statements must be typed at the beginning of every file. What is an import, you ask? The collections package is an example of a package, which is basically a bundle of pre-written code that you can call. Packages are designed to make your life easier so you don't have to rewrite a bunch of programs that people have spent long hours crafting in the past. To import a package is basically to load it into your file so you can use it. Counter is a part of the collections package, so to import Counter specifically, you'll want to import it using the from syntax as specified above. In this example, 'dog' appears twice, 'cat' three times, 'fry' once, 'leopard' once, and 'bread' twice. Counters are super useful for tasks like keyword analysis in text, survey analysis, or anything where you care about how frequently data occurs in a dataset! Conditional StatementsSo far, our code just runs everything in one go. But what if we only wanted to run things if certain conditions, or boolean statements, were true? That's where conditional statements come in! In Python, we specify conditional statements using if, elif, and else, as below: We first initialize two boolean statements. Then, we specify that we print 'myStatement is false!' if and only if myStatement is actually false. The syntax for if statements is if [someStatement]: followed by the code you want to execute if the condition is satisfied. Python then has an elif (short for else if) statement, which follows the same syntax, and it executes the given command if and only if the condition specified by elif is satisfied and all the conditions above it are not satisfied. Finally, else: functions as a catch-all--if none of the above conditions are satisfied, it will execute the command under it. "Else" can essentially be translated into English as "otherwise." In Python, it's important to pay attention to indentation: code that you want to execute under a conditional statement needs to be indented as it is above, or Python will give you an error! This will become increasingly important as you write more complex code, since having some code at the wrong level of indentation will cause your code to run incorrectly! This is different from some other free-form languages like Java, which don't associate formatting with the code's meaning. The default indentation amount for Python is four spaces, though two spaces is usually fine as well--just make sure to stay consistent within one file (mixing fours and twos will cause problems). Check your understanding of if, elif, and else statements with the quick quiz below! The answer and explanation will pop up once you hit submit. To further highlight the difference between if and elif, here's another block of code to think about: We can also nest conditionals, or put them inside each other! Example below: With nested if statements, we only execute the inner if statement if the outer condition is satisfied--think of the whole inner conditional statement as its own program that we only execute if the outer condition is true. LoopsWhat if we want to execute code multiple times (say 10, 100, or a million times)? It would be pretty tiring to write out the same code that many times, and that's why loops are so useful! Loops basically execute a block of code a certain number of times or while a certain condition is true. There are two main types of loops in Python. The first is the for loop, with an example below: There are a few new pieces of syntax here. First, the range(x, y) function gives us a list of integers from x to y - 1. As a shorthand, Python lets us type range(y) to mean the list of integers from zero to y - 1. Second, the general syntax for a for loop is for [reference variable] in [iterable object]:, followed by a new indented line with the code to execute in each iteration of the loop. A reference variable is a name, like i in our example, that is used as a variable name to iterate through every element in the iterable object. An iterable object is what it sounds like--an object that you can iterate or loop through. A common example is a list--you can go through each element in a list. So, for i in range(10) translates to for every element, which we'll call i, in the list of numbers from 0 to 9. The print(i) statement simply prints that element. Essentially, we have a loop that prints every element in a list of numbers. We can also operate on reference variables, give them different names, and work with other iterable objects! Examples: The first loop takes every element (number) in myFirstList that we created earlier and prints out that number plus one. The second loop iterates through a dictionary. In Python, when we iterate a reference variable through a dictionary, the reference variable refers to the keys. To get the values, we call the keys, as we do in myFirstDict[i]. Another piece of syntax: when we say print(something, somethingElse), it prints something, followed by a space, followed by somethingElse--the comma is essentially concatenation with a space inserted in between. We can also put loops inside each other (nested loops)! Example: Here, it's important to assign different names for your reference variables so Python doesn't get confused--if you were to use i in both the outer and inner loop, Python wouldn't know whether i refers to an element of the inner or outer loop. In this example, listInList is the list of lists we created earlier, so it prints out all of the elements in the inner lists in order. The second type of loop is called the while loop, which executes a block of code while a certain condition is true. Example below: The syntax for a while loop is while [condition]: followed by an indented block of the code you want to repeatedly execute. Important points about while loops:
FunctionsOne more fundamental concept in programming is the idea of a function. It's roughly defined as a sequence of steps encapsulated by a command, but here's a more human-oriented explanation. Let's say I told you to "try a bite of the pasta." You would then pick up a utensil, put the utensil in the dish with the pasta, swirl or pick up the pasta with your utensil, lift the utensil back up to your mouth, release the pasta from the utensil into your mouth, and chew and swallow the pasta. However, we don't go around telling people to "pick up a utensil, put the utensil in the dish with the pasta," et cetera. That's just way too many words, especially when we might want to tell multiple people to try a bite of the pasta on multiple occasions! We just say, "try a bite of the pasta." In this case, "try a bite of the pasta" is like a function that represents all of those steps that compose trying a bite of the pasta. It's like a shorthand that makes your life and your code easier and cleaner. Functions can also be applied to specific arguments. In the above example, we can consider pasta as our argument. I could tell you to try a bite of the salad, dumplings, chicken, or almost any food, and the basic process is the same--you pick up your utensil, put it in the dish with the food, pick up the food with your utensil, lift the utensil back up to your mouth, put the food in your mouth, and chew and swallow it. You're basically applying the function "try a bite" to the particular food that I'm telling you to try, so the food that I want you to try is like an argument. Another way to explain functions is that they're pretty similar to mathematical functions. If you have f(x) = 2x + 3, x is your argument, and f, which represents multiplication by 2 followed by adding 3, is your function. Functions in programming just generalize mathematical functions to a bunch more data types and actions. Here's an example of a function in Python designed to calculate the average of a list of numbers. As seen in the example, the syntax for functions in Python is def functionName(arguments separated by commas): followed by an indented block of the program that the function represents. You'll often want to return a value as the result of your function, which you do in Python with the return [blah] syntax. An explanation by example--the average of a list of numbers is a number, so you'll want to return that number. In our example, we keep a running total called total, initialize it to zero, loop through the entire list, add the value of every element to the total, and return the total divided by the number of elements (basically the definition of the mean). We can print function values just as we print normal variables. Importantly, we need to call a function for it to do anything. If you just run the block of code under the def, nothing will happen! We're basically just saying, here's what it means to do this, but we're not actually saying, "do this." When we call average in our print statement, that's where we're actually saying "do this." Analogously, I can tell you that f(x) = 2x + 3, but that's not going to do anything for us until you do something with that information (e.g. calculate f applied to a specific number, plot a bunch of values, or do anything that calls f). List ComprehensionList comprehension is a trick that's pretty unique to Python--it essentially allows you to apply functions, filters, and loops, all within the initial definition of a list! Some examples below, with an explanation that follows: The code above reads a lot like English, so it does what it looks like it does. Essentially, the first example is a list that just iterates through every element in range(12) and puts it in the list. The second example steps it up a bit--we add a condition that each element that goes into our list has to be even and can't be equal to four. So, this list ends up including the elements 2, 6, 8, 10, and 12. The third example applies a function and a filter: we take each element from listInList (our earlier nested list) and add the average of each list if and only if that average is greater than three. Our averages will come out to 2, 5, and 8, so our final list will consist of 5 and 8. List comprehension saves us a ton of work and space--we would otherwise have to initialize an empty list, write out a whole loop, check for all these filters, and apply functions one by one--but this trick allows us to do it all in one line! RecapThat's all we have for this introductory tutorial! To summarize, we've covered:
Of course, this introduction just barely scratches the surface of the entirety of Python and computer science. Further Python courses can be found here, here, and here. Below is a quick quiz for you to check your understanding of some of the concepts covered in here. Thanks for reading, and we hope you found the tutorial helpful! This post (and the rest of our blog posts) will be up here on our site for the rest of ever, so if you need a Python refresher at any time, feel free to revisit this page and the resources we've linked throughout! If you'd like to see all the code included in this tutorial in one place, we've put that here.
If you have a moment, please fill out this guest book to let us know that you've checked out this post and give us any feedback you might have--we really appreciate it! Feel free to also hop around this site and check out our previous blog post, which contains some COVID-19 related informational, educational, and mental health resources. Stay tuned for more content in the coming weeks--subscribe to our mailing list here to be the first to know when new tutorials and resources come out, and email us at [email protected] if you have any questions, concerns, or suggestions! Cutting to the chase: we've been inspired by many of the initiatives forming during the COVID-19 pandemic, so here's a list of resources and 2020 updates. This list is in no way comprehensive and is meant to be informative while not being overwhelming. As such, we welcome suggestions: feel free to email us at i[email protected] if you have a resource you would like included on this list or have concerns about the accuracy or legitimacy of any of the resources we've already listed. COVID-19: Learning, Researching, and ContributingIf you are able to learn and help, here are some resources that provide information about the novel coronavirus as well as some links to ways you can contribute to fighting the pandemic.
Mental Health and Coping With QuarantineWhile some of us are fortunate enough to have stable home environments in which we can give resources and carry on with our daily activities remotely, this is certainly not the case for everyone. Quarantine has exacerbated the problem of domestic abuse, and in general, this shift in lifestyle can be detrimental to mental health. To be clear: it's okay not to be okay. These are not normal times, and even though the people you interact with on social media may seem to be accomplishing things, "working on themselves," or "hustling," it is not at all necessary to operate as if life were normal. If you come out of this pandemic good health, you are doing great. It is completely acceptable to feel a range of emotions for a range of reasons--from graduations and other events being cancelled to job offers being rescinded to anything at all--don't feel obligated to stay positive or work 110%. It is also completely acceptable to reach out for help and to take advantage of self-help resources--it is not a sign of weakness, but rather a sign of strength. With that said, here are some mental health resources:
Educational Opportunities: Summer Programs, Workshops, Courses, etc.We reiterate that it is not at all necessary to "achieve" in any normal sense of the word this summer--whether you've had your internship or program cancelled, been struggling with a difficult home situation, or had family/friends directly affected by the pandemic, it's okay to take this time to focus on your situation and just do the bare minimum you need to do to survive. If and only if you have the time, bandwidth, and mental health to continue learning or working, here are some resources to help:
Education and Action: Combatting RacismWhile this isn't directly related to COVID-19 or to computational linguistics, we at LingHacks nonetheless think it's important to spread awareness about the systemic issue of racism in America. This is certainly in light of the recent murder incidents that have occurred in May 2020, but we acknowledge that it's also not a new issue--racism is older than America. We initially hesitated about getting "political" on our official page, but (1) racism is not a partisan issue, and (2) being able to ignore politics is a privilege that many people do not have. That said, LingHacks was by no stretch of the imagination founded as a human rights advocacy group, so we'll save the standard (though true) spiel about how racial equality is important in tech and computational linguistics--because racial equality is important for everyone and everything, not just for a specific person or organization's individual benefit. The authors of this post are also not black, so we recognize our privilege and recognize that it's not our place to further preach about this. However, complete silence is complicity, so here are some resources to educate yourself about systemic racism and to make a difference through donating to advocacy organizations and pressuring public officials. Every signature, message, call, and dollar makes a difference, so please do everything that you are able. As a disclaimer, this list is by no means exhaustive or prescriptive (and please feel free to email us if we've included a suspicious resource or if you want a resource added to this list), but these are just some of the resources out there.
LingHacks UpdatesAt this time, LingHacks III has been postponed to the spring of 2021. It will be in-person if safe, but we will plan for a virtual alternative in the not-unlikely event that large gatherings are still dangerous at that time. Between now and then, we are planning to host some free online workshops and publish some programming, machine learning, and computational linguistics-related tutorials and resource collections on this blog. We've also launched a mailing list, where we'll be sharing resources and updates throughout the coming months: subscribe here. Stay tuned for more updates, and in the mean time, stay home if you can, wash your hands often, and wear masks if you must leave home for essential tasks.
One last note for this post: we wanted to just say thank you. Thank you to all of the essential workers fighting on the front lines to make sure the rest of us stay alive, fed, and healthy. Thank you to everyone who is observing social distancing protocols and saving lives by staying home. Thank you to the educators and parents who are providing academic continuity for students during the crisis. Thank you to everyone who has made nonprofit initiatives like LingHacks possible. Thank you. We just wrapped up our first independently hosted workshop series--Workshops on Words at the Los Altos Library. Team Los Altos had a great time teaching students of all different levels about Python, NLTK, WordNet, spell check, and word sense disambiguation. Stay tuned for more workshops and LingHacks II! We're so excited to expand our operations for the 2018-19 school year! After running our first conference and hackathon series last year, we were inspired to expand our impact nationally. The members of our executive team hail from all across the nation, including New York, New Orleans, Baltimore, and Austin in addition to the Bay Area. To that end, we're launching three new initiatives in addition to organizing our second hackathon:
|
LingHacksNote: as of June 2022, this blog (and the rest of the LingHacks site) has moved to http://linghacks.tech. This is where we post cool content about computational linguistics & machine learning as well as exciting announcements about our programs and partner programs! Archives
January 2022
Categories |
 RSS Feed
